Hey everyone, while I haven't had time to make a video about the van build I've been working on for the past few months, I figured I could at least write about it here and share a few photos as I finish it over the next few months.
I chose the 2010 Ford Transit connect on a bit of a whim; I was looking at ebay ads for all kinds of vehicles. Vans, box trucks, school buses, etc... but I came across a listing for my van starting at $8,000, with a 'make an offer' option. This was weird because it was several thousand dollars under the average asking price for this kind of van (around 11k), and it was in unusually good condition with only 114,000 miles on it. Figuring they'd never accept, I made an offer of $7,000 and to my surprise, they accepted.

Not only was it an exceptional price, but the transit connect hit all the boxes I was looking for in a new vehicle. Low miles, good mpg (about 25mpg highway), and big enough for me to sleep in and sit up comfortably (although it met this requirement just barely).
The sitting up requirement was especially important since I had previously been living and traveling in my second Prius electric hybrid (a gen 3 2012 with 116k on it), which while amazing on gas mileage, had absolutely no room to sit up in while in bed, and it was starting to feel a bit like a coffin, and it was time to move into something with just a little more room.

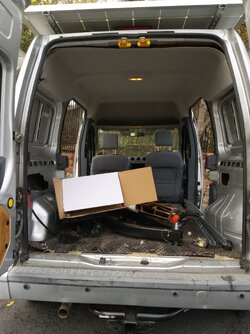
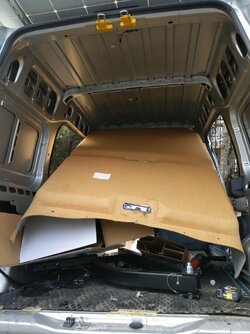
I picked up the van a few hours away from Austin, Texas and took it home to begin work on it. It's former life was as a passenger vehicle for old folks in wheel chairs, maintained by an ambulance company. This meant it came with a wheel chair lift. While a lot of folks swore up and down I could sell the lift for quite a bit of money, seems the market for that kind of thing was a bit saturated in my area, and after over a month of advertising it on both Facebook marketplace and Craigslist, I couldn't find any takers and finally ended up just dropping it off at the local recycling facility.
After that, my first task was to remove the floor and ceiling, which wasn't too difficult, although due to the mounts left over from the wheel chair lift, I had to use an angle grinder to cut the heads off those bolts (they were sealed with locktite and wouldn't come out any other way).
My overall plan for this van was to do a complete "van life" build (although I hate the #vanlife IG culture) with everything I'd need to be comfortable traveling for the next few years. A full solar panel setup, water for showers and drinking, and storage for my camera and computer equipment. During the pandemic I've been fortunate enough to be working a pretty great paying tech job, although I'm very much looking forward to quitting this spring.


I really wasn't sure how everything I wanted was going to fit on the roof, so I set out to make my own roof rails as detailed in this video so I could put the solar panel I had bought on there and see how much room I had left for the Maxxair Fan I was planning on installing and whatever else I could fit. I used the angle grinder once again to cut the super struts to size and matched the nuts and bolts to the already installed threaded mounts (meaning, no roof hole drilling, yay). This was about half the cost of buying a factory made rack online, and gave me customization options I'll detail later that wouldn't have been possible with a factory rack. I also zip-tied some rubber pads to keep things from rattling around.

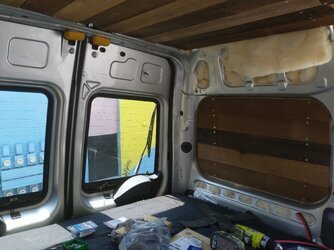
Next item on the list was to install sound deadener on the roof and walls. I've seen some folks go crazy with this stuff and cover their vans head to toe, but this stuff (I'm using the killmat brand) is expensive and I'm not trying to create a sound studio cave, just reduce road noise from rattling metal. So I pasted it between the ridges of the roof and any other spots that seems sensible. I'll be doing the same to the floor when the time comes.
One of the biggest jobs was cutting a hole in the roof to make room for the Maxxair fan I mentioned earlier. This is a 12 volt electric van that has 10 different speeds, and can suck air out as well as blow air in. It's probably the most popular 'van life' item to have, since it keeps things cool in the van so I won't be sweating my ass off. Of course, cutting a hole in your roof can be a bit scary.

Placing the 14 x 14 inch cardboard template I made on the ceiling of the van from the inside, I drilled four holes at each corner, then got up on the roof and cut out a square with a jigsaw power tool. To be honest, my cuts weren't that great, and I was kind of afraid I'd screwed it up already. I re-cut the lines to make it more even and when I tested the flange that was going to be in that hole, it just barely fit, but a tight fit is what I wanted anyways, so it worked out. I used a file to sand down the sharp edges of the cut, and applied a silver anti-rust primer paint to the edges to keep it from rusting.


By this time I'd realized that my van had unusually deep ridges in the roof, and this fan seemed to be meant for flat roofs. A quick internet search and a week later, I had in my hands a template made specifically for providing a flat surface for me fan that filled in the ridges of my van roof, made from machined PVC sold by a couple that sells them on ebay (around $80).


I used the butyl tape (basically it's sealant that comes on a removable strip) and clamps to seal the frame to the roof, then another layer of butyl tape on top of that and put the fan's plastic frame onto the PVC frame, using bigger clamps this time around (I returned the previous clamps to home depot) to squish it all together. I made sure to use plenty of butyl tape so it was squeezing out quite a bit once I clamped everything down. I'm not taking any chances on water leaks.

Speaking of which, my next step was to apply a caulking sealant to the outside of the frame, paying special attention to covering everything as well as I could without making a complete mess. While I used a caulking gun to apply everything, I eventually just ended up fingerpainting all around the frame with the caulking until I was satisfied everything was sealed.


Finally I screwed down the plastic frame the fan would sit on and let it set for about two days. At that point the fan was ready to install. I just dropped it in and screwed in the included screws and it was done! I couldn't believe it. It was probably around 20 hours of work total, but once it was finished, it looked pretty good.
While all the caulking and sealant was setting, I went about installing the rear cargo box on the van. A few weeks back I had an auto garage install a two inch hitch kit that I'd bought on etrailers (I tried to do it myself with a friend first, but it proved too difficult to install without raising on a lift first). The hitch kit was around $170 I believe, and getting it installed was another $160.

I used the same plastic cargo box from tractor supply co that I'd used on both of my previous Priuses, since it's cheap, light, and can be easily modified. This time around though, I would be using a swinging cargo hitch, so I could swing the cargo box off to the right, and still open the barn doors on the back of the van (which will be important for the shower I'll discuss later). This swinging hitch was fucking expensive at $400, and it was the cheapest one I could find (many go up to $800 or more). So while it certainly hurt the wallet, the end result was pretty neat, and kind of necessary considering how little room there is in this tiny van.
[before and after shots of swing hitch will go here]


Next up, I used the angle grinder once again to grind off what little rust there was on the floor of the van, then painted over the ground out spots with the silver anti-rust primer I used on the edges of the hole I cut in the roof earlier.
The most recent work on the van has been filling in some of the holes left in the floor from the wheel chair lift mounts. To fix this I used a product called steelstik. Making sure to wear plastic gloves, you mix the putty together and it solidifies hard as rock. So I used this along with pennies I had to cover and fill the holes, and it turned out pretty well.
That's where I'm at for now. In my next post I'll be showing how I plan to mount a vehicle awning and screen room to the side of the van. My goal is to finish this build by the time I leave Texas in May, so I'll keep updating this thread as things progress.
Future plans include:
Of course, let me know if you have questions or suggestions!
I chose the 2010 Ford Transit connect on a bit of a whim; I was looking at ebay ads for all kinds of vehicles. Vans, box trucks, school buses, etc... but I came across a listing for my van starting at $8,000, with a 'make an offer' option. This was weird because it was several thousand dollars under the average asking price for this kind of van (around 11k), and it was in unusually good condition with only 114,000 miles on it. Figuring they'd never accept, I made an offer of $7,000 and to my surprise, they accepted.
Not only was it an exceptional price, but the transit connect hit all the boxes I was looking for in a new vehicle. Low miles, good mpg (about 25mpg highway), and big enough for me to sleep in and sit up comfortably (although it met this requirement just barely).
The sitting up requirement was especially important since I had previously been living and traveling in my second Prius electric hybrid (a gen 3 2012 with 116k on it), which while amazing on gas mileage, had absolutely no room to sit up in while in bed, and it was starting to feel a bit like a coffin, and it was time to move into something with just a little more room.
I picked up the van a few hours away from Austin, Texas and took it home to begin work on it. It's former life was as a passenger vehicle for old folks in wheel chairs, maintained by an ambulance company. This meant it came with a wheel chair lift. While a lot of folks swore up and down I could sell the lift for quite a bit of money, seems the market for that kind of thing was a bit saturated in my area, and after over a month of advertising it on both Facebook marketplace and Craigslist, I couldn't find any takers and finally ended up just dropping it off at the local recycling facility.
After that, my first task was to remove the floor and ceiling, which wasn't too difficult, although due to the mounts left over from the wheel chair lift, I had to use an angle grinder to cut the heads off those bolts (they were sealed with locktite and wouldn't come out any other way).
My overall plan for this van was to do a complete "van life" build (although I hate the #vanlife IG culture) with everything I'd need to be comfortable traveling for the next few years. A full solar panel setup, water for showers and drinking, and storage for my camera and computer equipment. During the pandemic I've been fortunate enough to be working a pretty great paying tech job, although I'm very much looking forward to quitting this spring.
I really wasn't sure how everything I wanted was going to fit on the roof, so I set out to make my own roof rails as detailed in this video so I could put the solar panel I had bought on there and see how much room I had left for the Maxxair Fan I was planning on installing and whatever else I could fit. I used the angle grinder once again to cut the super struts to size and matched the nuts and bolts to the already installed threaded mounts (meaning, no roof hole drilling, yay). This was about half the cost of buying a factory made rack online, and gave me customization options I'll detail later that wouldn't have been possible with a factory rack. I also zip-tied some rubber pads to keep things from rattling around.
Next item on the list was to install sound deadener on the roof and walls. I've seen some folks go crazy with this stuff and cover their vans head to toe, but this stuff (I'm using the killmat brand) is expensive and I'm not trying to create a sound studio cave, just reduce road noise from rattling metal. So I pasted it between the ridges of the roof and any other spots that seems sensible. I'll be doing the same to the floor when the time comes.
One of the biggest jobs was cutting a hole in the roof to make room for the Maxxair fan I mentioned earlier. This is a 12 volt electric van that has 10 different speeds, and can suck air out as well as blow air in. It's probably the most popular 'van life' item to have, since it keeps things cool in the van so I won't be sweating my ass off. Of course, cutting a hole in your roof can be a bit scary.
Placing the 14 x 14 inch cardboard template I made on the ceiling of the van from the inside, I drilled four holes at each corner, then got up on the roof and cut out a square with a jigsaw power tool. To be honest, my cuts weren't that great, and I was kind of afraid I'd screwed it up already. I re-cut the lines to make it more even and when I tested the flange that was going to be in that hole, it just barely fit, but a tight fit is what I wanted anyways, so it worked out. I used a file to sand down the sharp edges of the cut, and applied a silver anti-rust primer paint to the edges to keep it from rusting.
By this time I'd realized that my van had unusually deep ridges in the roof, and this fan seemed to be meant for flat roofs. A quick internet search and a week later, I had in my hands a template made specifically for providing a flat surface for me fan that filled in the ridges of my van roof, made from machined PVC sold by a couple that sells them on ebay (around $80).
I used the butyl tape (basically it's sealant that comes on a removable strip) and clamps to seal the frame to the roof, then another layer of butyl tape on top of that and put the fan's plastic frame onto the PVC frame, using bigger clamps this time around (I returned the previous clamps to home depot) to squish it all together. I made sure to use plenty of butyl tape so it was squeezing out quite a bit once I clamped everything down. I'm not taking any chances on water leaks.
Speaking of which, my next step was to apply a caulking sealant to the outside of the frame, paying special attention to covering everything as well as I could without making a complete mess. While I used a caulking gun to apply everything, I eventually just ended up fingerpainting all around the frame with the caulking until I was satisfied everything was sealed.
Finally I screwed down the plastic frame the fan would sit on and let it set for about two days. At that point the fan was ready to install. I just dropped it in and screwed in the included screws and it was done! I couldn't believe it. It was probably around 20 hours of work total, but once it was finished, it looked pretty good.
While all the caulking and sealant was setting, I went about installing the rear cargo box on the van. A few weeks back I had an auto garage install a two inch hitch kit that I'd bought on etrailers (I tried to do it myself with a friend first, but it proved too difficult to install without raising on a lift first). The hitch kit was around $170 I believe, and getting it installed was another $160.
I used the same plastic cargo box from tractor supply co that I'd used on both of my previous Priuses, since it's cheap, light, and can be easily modified. This time around though, I would be using a swinging cargo hitch, so I could swing the cargo box off to the right, and still open the barn doors on the back of the van (which will be important for the shower I'll discuss later). This swinging hitch was fucking expensive at $400, and it was the cheapest one I could find (many go up to $800 or more). So while it certainly hurt the wallet, the end result was pretty neat, and kind of necessary considering how little room there is in this tiny van.
[before and after shots of swing hitch will go here]
Next up, I used the angle grinder once again to grind off what little rust there was on the floor of the van, then painted over the ground out spots with the silver anti-rust primer I used on the edges of the hole I cut in the roof earlier.
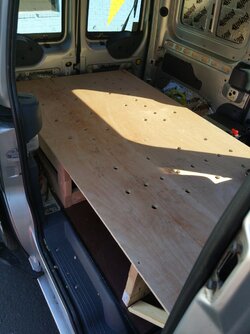
The most recent work on the van has been filling in some of the holes left in the floor from the wheel chair lift mounts. To fix this I used a product called steelstik. Making sure to wear plastic gloves, you mix the putty together and it solidifies hard as rock. So I used this along with pennies I had to cover and fill the holes, and it turned out pretty well.
That's where I'm at for now. In my next post I'll be showing how I plan to mount a vehicle awning and screen room to the side of the van. My goal is to finish this build by the time I leave Texas in May, so I'll keep updating this thread as things progress.
Future plans include:
- Installing wood floors, walls, ceiling
- Installing a 10 gallon water tank (drinking water)
- Installing a solar shower
- Microwave
- Solar panel system, including a 200ah lithium battery and 230w panel
- Electrical and plumbing
- Bed and under-bed storage area
Of course, let me know if you have questions or suggestions!