@Aleksi (quoting the Pardeys) said "Go small, go simple, go now".
I'm not that smart..
going big, going complicated & maybe.. maybe heading out in March 2021...
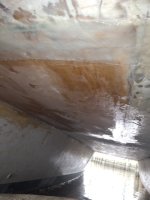
So.. Repairs continue... The port berth had some discoloration & the cabin corner was soft. I imagine I could have just slapped resin all over everything & it would have held for a few months, but not for the several years I'm hoping she'll last.
I have never touched a boat repair in my life, but I'm fortunate to have solid guidance from the previous owner. On top of that I know I don't know, so I'm going to overbuild the repairs as far as I am able. So far I've used only marine grade plywood, Oak and plenty of top end resin (West Epoxy systems).
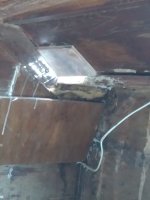
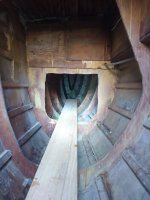
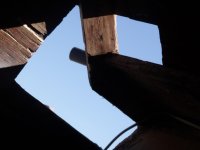
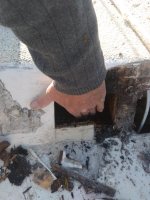
In any case I started in on the port berth last week, before the current shitty weather:View attachment 58106
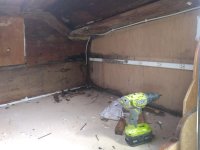
This is after tearing out the headboard shelf, which is when I got a good eyefull of what was actually going on in the corner. After sounding the wood it was obvious a previous repair had been done, and failed. the plywood used then was definitely not marine, and was in danger of rotting out completely, although, by God, the original cedar framing was still sound : )
So.. the tearout & rebuild commenced:
View attachment 58107
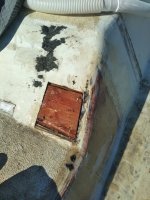
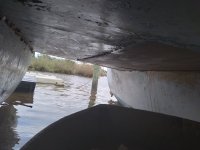
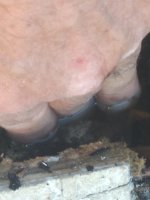
That was just beyond the wood soft enough to punch through with a couple of good taps with a chisel, but it was pretty clear a lot more was going to have to come out. This is the exterior view:
View attachment 58108
Of course the cuts needed to be cleaned up & another, smaller one made, adjacent:
View attachment 58110
Also some delamination of a cabin strut, which fortunately looked worse than it actually was:View attachment 58111
I bonded her with an oak support, screws & plenty of resin. I'm pretty sure she's close to original strength.
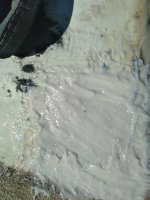
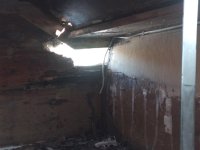
I decided to chase the soft stuff further out, which got me just beyond the cabin wall, but low & behold.. arrgghhhh.. standing water in the topside compartment (???!!!):
View attachment 58114w
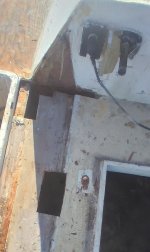
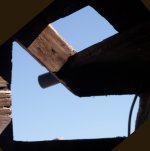
& that took me to my port navigation light, and I was hoping it would end there:
View attachment 58112
I was not so lucky...
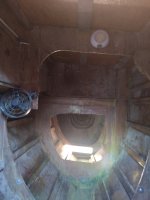
I drilled a few holes to see where the drainage would stop, and water came out all the way to the forward corner, but then the wood became sound, again:
View attachment 58115
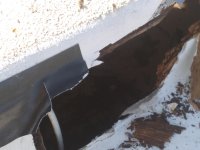
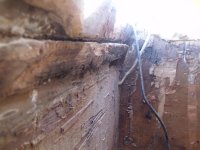
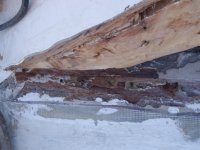
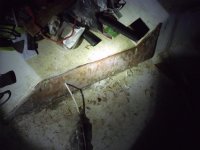
That's looking down from the bow ama wing. The light brown stuff is the original timber, and other than that 3" semi-pentagonal hole, the original cedar remained sound. Center lower is my oak fastening plank, later screwed and epoxied in place.
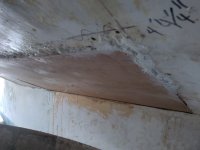
This is the original cedar timber, fiberglass resin & a bit of fiberglas skin showing through. 45 fucking years old, & still reasonably sound..
View attachment 58116
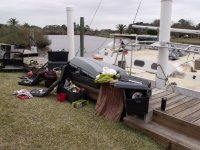
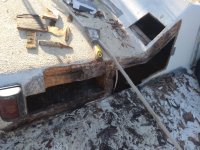
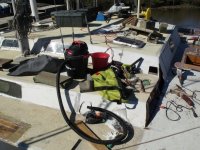
What the work area looks like:
View attachment 58118
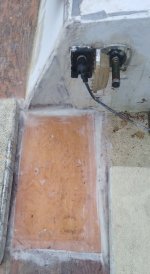
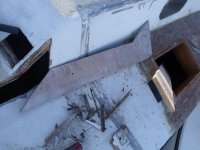
Having finished the removal, I was now able to cut my repair sheet. This was more of a bitch than it looks, because the damn sheet was pretty irregular:
View attachment 58117
I cut in straight lines, but the hull is tensioned cedar & fiberglass, so I had to use my oscillating cutout tool to shape it to size (small round hole is for wire to the navigation light). Also, this is late afternoon of Day Two for this repair (two long, full days of 10 & 12 hours each, minimum). Like I said, I've never touched a boat repair (other than a rubber patch, maybe), and I'm a pretty shitty carpenter, too. But.. when my crap is finally together, it generally stays.
Ugly as crap on a windshield, but usually as strong as cement & cinder-block.
I guess we'll see.
In any case I finish the fit at about 8:00 PM or so. That doesn't even count the cleanup, because shitty weather was coming in, so the tools had to go back into storage. Day three was additional sanding & shaping, & cleanup of the epoxy shit-throw. The photo below is just the structural placement. When the weather's good enough to finish up, I'll post the final photos.
View attachment 58119
I've been chasing down a *lot* of soft wood. That's been the main problem, but in each case it's been repairable.. so far.. When I get her to dry dock I'll see just how much all the work has actually been worth.
A lot more work, arguably, than I expected, but at the same time I've come to admire this vessel to the point that I don't want to leave her half done.
Could I drag her out & just cut loose with minimal repairs?
Sure, at least in as far as I would be lucky enough to find folks who know how to sail..
She has good lines, fairly good hardware & good sails. Her galley functions & she might be great for a sink or swim adventure in the US coastal or Caribbean waters.
But is that what she deserves?
Hell no.
This ship has been lovingly constructed by hand.
I don't know who built it, but it was a major project; a custom build by a master carpenter/shipwright & crew.
As I go through her, I'm just astounded by what must be near to TEN THOUSAND beautifull, brass nails.
The cedar is strong. The resin they used, abundant.
I'm actually pretty lucky she's as repairable as she is. I'm still in 'budget' & on 'schedule', with quite a bit of room left over (just basically able to get her water tight & to dry-dock, before I have to find work, again).
I'm seeing that this boat really is a relationship.
I have to give it everything to make it what I hope, even if it turns out that it *can't* be what I hope. Not that it won't be, but that if I don't give it everything, not only will it not likely be so, but that I'll never actually know if it could have been.
Her name is Ameris; "may you be loved"
That is the name she came to me with, and she will Keep It.
So far she is, in fact, lovable...
a pain in the ass, but very, very lovable..
-----
BTW Larry Pardey's obit is here: Remembering Larry Pardey, 1938 -- 2020 - http://www.oldsaltblog.com/2020/07/remembering-larry-pardey-1938-2020/ )
I'm not that smart..
going big, going complicated & maybe.. maybe heading out in March 2021...
So.. Repairs continue... The port berth had some discoloration & the cabin corner was soft. I imagine I could have just slapped resin all over everything & it would have held for a few months, but not for the several years I'm hoping she'll last.
I have never touched a boat repair in my life, but I'm fortunate to have solid guidance from the previous owner. On top of that I know I don't know, so I'm going to overbuild the repairs as far as I am able. So far I've used only marine grade plywood, Oak and plenty of top end resin (West Epoxy systems).
In any case I started in on the port berth last week, before the current shitty weather:View attachment 58106
This is after tearing out the headboard shelf, which is when I got a good eyefull of what was actually going on in the corner. After sounding the wood it was obvious a previous repair had been done, and failed. the plywood used then was definitely not marine, and was in danger of rotting out completely, although, by God, the original cedar framing was still sound : )
So.. the tearout & rebuild commenced:
View attachment 58107
That was just beyond the wood soft enough to punch through with a couple of good taps with a chisel, but it was pretty clear a lot more was going to have to come out. This is the exterior view:
View attachment 58108
Of course the cuts needed to be cleaned up & another, smaller one made, adjacent:
View attachment 58110
Also some delamination of a cabin strut, which fortunately looked worse than it actually was:View attachment 58111
I bonded her with an oak support, screws & plenty of resin. I'm pretty sure she's close to original strength.
I decided to chase the soft stuff further out, which got me just beyond the cabin wall, but low & behold.. arrgghhhh.. standing water in the topside compartment (???!!!):
View attachment 58114w
& that took me to my port navigation light, and I was hoping it would end there:
View attachment 58112
I was not so lucky...
I drilled a few holes to see where the drainage would stop, and water came out all the way to the forward corner, but then the wood became sound, again:
View attachment 58115
That's looking down from the bow ama wing. The light brown stuff is the original timber, and other than that 3" semi-pentagonal hole, the original cedar remained sound. Center lower is my oak fastening plank, later screwed and epoxied in place.
This is the original cedar timber, fiberglass resin & a bit of fiberglas skin showing through. 45 fucking years old, & still reasonably sound..
View attachment 58116
What the work area looks like:
View attachment 58118
Having finished the removal, I was now able to cut my repair sheet. This was more of a bitch than it looks, because the damn sheet was pretty irregular:
View attachment 58117
I cut in straight lines, but the hull is tensioned cedar & fiberglass, so I had to use my oscillating cutout tool to shape it to size (small round hole is for wire to the navigation light). Also, this is late afternoon of Day Two for this repair (two long, full days of 10 & 12 hours each, minimum). Like I said, I've never touched a boat repair (other than a rubber patch, maybe), and I'm a pretty shitty carpenter, too. But.. when my crap is finally together, it generally stays.
Ugly as crap on a windshield, but usually as strong as cement & cinder-block.
I guess we'll see.
In any case I finish the fit at about 8:00 PM or so. That doesn't even count the cleanup, because shitty weather was coming in, so the tools had to go back into storage. Day three was additional sanding & shaping, & cleanup of the epoxy shit-throw. The photo below is just the structural placement. When the weather's good enough to finish up, I'll post the final photos.
View attachment 58119
I've been chasing down a *lot* of soft wood. That's been the main problem, but in each case it's been repairable.. so far.. When I get her to dry dock I'll see just how much all the work has actually been worth.
A lot more work, arguably, than I expected, but at the same time I've come to admire this vessel to the point that I don't want to leave her half done.
Could I drag her out & just cut loose with minimal repairs?
Sure, at least in as far as I would be lucky enough to find folks who know how to sail..
She has good lines, fairly good hardware & good sails. Her galley functions & she might be great for a sink or swim adventure in the US coastal or Caribbean waters.
But is that what she deserves?
Hell no.
This ship has been lovingly constructed by hand.
I don't know who built it, but it was a major project; a custom build by a master carpenter/shipwright & crew.
As I go through her, I'm just astounded by what must be near to TEN THOUSAND beautifull, brass nails.
The cedar is strong. The resin they used, abundant.
I'm actually pretty lucky she's as repairable as she is. I'm still in 'budget' & on 'schedule', with quite a bit of room left over (just basically able to get her water tight & to dry-dock, before I have to find work, again).
I'm seeing that this boat really is a relationship.
I have to give it everything to make it what I hope, even if it turns out that it *can't* be what I hope. Not that it won't be, but that if I don't give it everything, not only will it not likely be so, but that I'll never actually know if it could have been.
Her name is Ameris; "may you be loved"
That is the name she came to me with, and she will Keep It.
So far she is, in fact, lovable...
a pain in the ass, but very, very lovable..
-----
BTW Larry Pardey's obit is here: Remembering Larry Pardey, 1938 -- 2020 - http://www.oldsaltblog.com/2020/07/remembering-larry-pardey-1938-2020/ )
Attachments
-
 original port berth damage 2.jpg220.5 KB · Views: 511
 -
 Port Berth Tearout 1 closeup .jpg212.1 KB · Views: 497
 -
 Port Berth ext Tearout 1.jpg236.4 KB · Views: 545
 -
 port berth timbers 3 .JPG101.2 KB · Views: 314
 -
 port berth timbers 3a.JPG91.1 KB · Views: 520
 -
 port berth timber split1.JPG307.4 KB · Views: 533
 -
 Port Berth ext Tearout 2 .jpg476.8 KB · Views: 486
 -
 standing water 1.jpg530.8 KB · Views: 304
 -
 port bert h20 accumulation 1.jpg254 KB · Views: 466
 -
 Port Berth ext Tearout 2.JPG323.8 KB · Views: 471
 -
 good port berth timber closeup 2.JPG289.1 KB · Views: 684
 -
 finished port berth cutout 1 late afternoon.JPG288.3 KB · Views: 447
 -
 port berth rebuild afternoon.JPG377.5 KB · Views: 709
 -
 port berth seal PM 1.JPG264.9 KB · Views: 438