You are using an out of date browser. It may not display this or other websites correctly.
You should upgrade or use an alternative browser.
You should upgrade or use an alternative browser.
$150 bike camper: DIY micro mobile home
- Thread starter Matt Derrick
- Start date
celticpunk
New member
Pretty cool, but I wouldn't want to tow it up many hills or in a strong wind unless it's a tail wind.
Whereamiwhatdoido
New member
Thanks for sharing Matt, it's a pretty neat thing he's made actually. Quite a good way to keep the weight down too. With no drivers license and crazy laws, regulations and taxes on camper vans where I'm from this might be something to really look into.
kecleon
New member
45lbs is really impressively light. I'd like to build something like this for fun though wouldn't want to travel round with it.
Some information and photos
http://www.elkinsdiy.com/mobile-shelters/micro-airstream-bike-camper/
Some information and photos
http://www.elkinsdiy.com/mobile-shelters/micro-airstream-bike-camper/
i'm going to repost the pictures here for archival reasons:
View attachment 30238
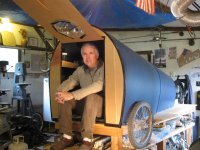
Bicycle Camper Prototype
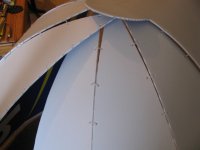
I learned a lot from my last bicycle camper prototype. One thing I didn’t like was the limited room in the tapered front, which made turning around inside rather difficult. The idea to make a bicycle camper with the resemblance of an airstream nose came to me a while back, but instead of making a full scale mock-up like my previous project, I decided first to make a 1/4 scale model. Again, this frameless arced design is borrowed from the ‘Emergency Homeless Shelter’ design and build techniques.
View attachment 30239The model proved that the main body, minus the floor and rear wall, would only need two 4x8ft sheets of 4mm thick fluted plastic.
I originally thought of using plywood for the rear door but opted for light weigh Coroplast.
View attachment 30240
View attachment 30241
The wheels could be 20″ front bicycle wheels. I show a flexible solar panel for charging personal devices, LED lights and such.
BUILDING THE REAL THING!
I had 5 recycled full size campaign signs kicking around, so I decide to finally make the camper.
View attachment 30242
View attachment 30243
View attachment 30244
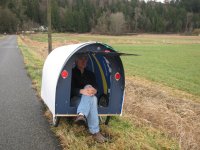
After sitting in the dome area I decided to eliminate the front storage compartment and have it so I would sit against the front wall and face the rear door. I had forgotten how difficult it was turning around to face forward in the narrow mock-up. In doing this I would loose the desk top and some storage, but the view and roominess would definitely be better.
View attachment 30245
Another panel is added. Unlike my Homeless Emergency Shelter, I used small zip ties to join the panels together. Later I added 2″ white Duct tape over the outside seams.
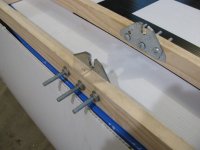
View attachment 30246 For the frame I used six 1″x2″ pine boards purchased for under a buck apiece. The cheap electrical plate wheel supports was not my idea, but borrowed and modified from a trailer design I saw on the internet. Thanks to the person who thought of this!
The front wheel weighs 3.5 pounds and the rear wheel 4.5 pounds. The wheels and frame together weigh 18 pounds at a total cost of under $40.
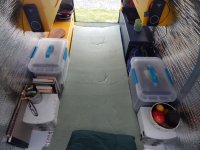
View attachment 30247The hammock bed used 2 layers, the first using four 18″ by 24″ campaigns signs. The second was a solid sheet of fluted plastic.
View attachment 30248
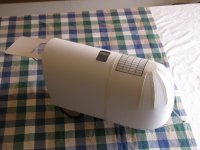
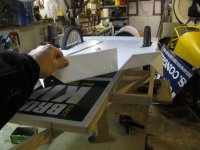
At under 45 pounds, with the 3″ thick foam pad and cabinets, it pulled very easily. I am however going to need a longer mirror arm to see around the shelter. I came up with this simple tow bar made from 1/2″ electrical conduit and a swiveling ball joint. It works great and the bike can be laid down flat.
View attachment 30249
The upward swinging door makes for a nice sun shade and light rain protector.
View attachment 30250
View attachment 30251
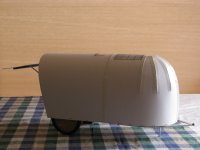
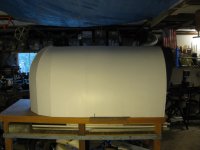
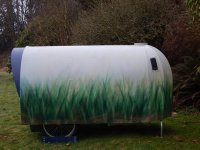
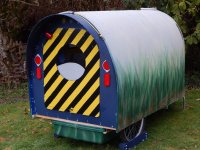
Here it is with a semi camo rattle-can paint job. I used Krylon fusion paint that’s meant for plastic. I used this on my Homeless Emergency Shelter and it’d held up now for four years. Unfortunately it doesn’t stick to well to Duct tape. Maybe if I used Vinyl tape?The door wall is reminiscent of my Homeless Emergency Shelter having a round window that opens, except this window is made of opaque coroplast. Once the wheel chucks are installed the front legs are swung down.
View attachment 30252
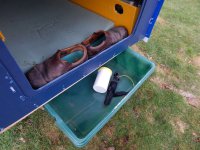
My shoes store nicely at the foot of the 3″ thick foam pad. The lower storage tub is for heavy items.
View attachment 30253
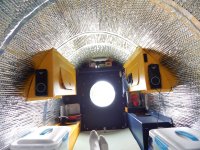
The dome wall makes for a nice back rest. The music acoustics are great.
View attachment 30254
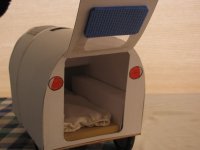
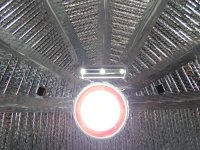
The skylight or upper vent is a recycled gallon bucket. Ample calking was added around the edges. A Plexiglas window was added to the lid. For keeping cool another lid can be added that has bug screen instead of Plexiglas.
View attachment 30255
The skylight or upper vent is a recycled gallon drywall bucket. Ample calking was added around the edges. A hole was added to the lid and a Plexiglas view port riveted on. More calking was added. For keeping cool another lid can be added that has bug screen instead of Plexiglas. I was going to add a small circulation fan but never got around to it. Maybe this summer.
View attachment 30256
View attachment 30257
I used spray-on Elmers glue to attach the bubble insulation. Later I added the 2″ wide chrome colored duct tape to the seams.
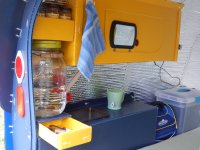
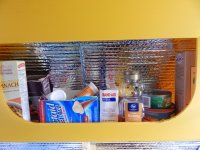
View attachment 30258 The two upper Coroplast cabinets, although small and light weight, are strong and hold a fair amount of items.
View attachment 30259
This little drawer is actually my favorite detail in the camper.
View attachment 30260Although I’m not an advocate for Walmart practices, I reluctantly found my speakers their for cheap.
If you buy a dollar meal you can also order a cup of ice. Place the ice in a zip lock bag, stick it in your little cooler and you have a micro frig for a day.
Plans are now available for this camper. I’ve also added lessons and improvements in the plans.
View attachment 30238
Bicycle Camper Prototype
I learned a lot from my last bicycle camper prototype. One thing I didn’t like was the limited room in the tapered front, which made turning around inside rather difficult. The idea to make a bicycle camper with the resemblance of an airstream nose came to me a while back, but instead of making a full scale mock-up like my previous project, I decided first to make a 1/4 scale model. Again, this frameless arced design is borrowed from the ‘Emergency Homeless Shelter’ design and build techniques.
View attachment 30239The model proved that the main body, minus the floor and rear wall, would only need two 4x8ft sheets of 4mm thick fluted plastic.
I originally thought of using plywood for the rear door but opted for light weigh Coroplast.
View attachment 30240
View attachment 30241
The wheels could be 20″ front bicycle wheels. I show a flexible solar panel for charging personal devices, LED lights and such.
BUILDING THE REAL THING!
I had 5 recycled full size campaign signs kicking around, so I decide to finally make the camper.
View attachment 30242
View attachment 30243
View attachment 30244
After sitting in the dome area I decided to eliminate the front storage compartment and have it so I would sit against the front wall and face the rear door. I had forgotten how difficult it was turning around to face forward in the narrow mock-up. In doing this I would loose the desk top and some storage, but the view and roominess would definitely be better.
View attachment 30245
Another panel is added. Unlike my Homeless Emergency Shelter, I used small zip ties to join the panels together. Later I added 2″ white Duct tape over the outside seams.
View attachment 30246 For the frame I used six 1″x2″ pine boards purchased for under a buck apiece. The cheap electrical plate wheel supports was not my idea, but borrowed and modified from a trailer design I saw on the internet. Thanks to the person who thought of this!
The front wheel weighs 3.5 pounds and the rear wheel 4.5 pounds. The wheels and frame together weigh 18 pounds at a total cost of under $40.
View attachment 30247The hammock bed used 2 layers, the first using four 18″ by 24″ campaigns signs. The second was a solid sheet of fluted plastic.
View attachment 30248
At under 45 pounds, with the 3″ thick foam pad and cabinets, it pulled very easily. I am however going to need a longer mirror arm to see around the shelter. I came up with this simple tow bar made from 1/2″ electrical conduit and a swiveling ball joint. It works great and the bike can be laid down flat.
View attachment 30249
The upward swinging door makes for a nice sun shade and light rain protector.
View attachment 30250
View attachment 30251
Here it is with a semi camo rattle-can paint job. I used Krylon fusion paint that’s meant for plastic. I used this on my Homeless Emergency Shelter and it’d held up now for four years. Unfortunately it doesn’t stick to well to Duct tape. Maybe if I used Vinyl tape?The door wall is reminiscent of my Homeless Emergency Shelter having a round window that opens, except this window is made of opaque coroplast. Once the wheel chucks are installed the front legs are swung down.
View attachment 30252
My shoes store nicely at the foot of the 3″ thick foam pad. The lower storage tub is for heavy items.
View attachment 30253
The dome wall makes for a nice back rest. The music acoustics are great.
View attachment 30254
The skylight or upper vent is a recycled gallon bucket. Ample calking was added around the edges. A Plexiglas window was added to the lid. For keeping cool another lid can be added that has bug screen instead of Plexiglas.
View attachment 30255
The skylight or upper vent is a recycled gallon drywall bucket. Ample calking was added around the edges. A hole was added to the lid and a Plexiglas view port riveted on. More calking was added. For keeping cool another lid can be added that has bug screen instead of Plexiglas. I was going to add a small circulation fan but never got around to it. Maybe this summer.
View attachment 30256
View attachment 30257
I used spray-on Elmers glue to attach the bubble insulation. Later I added the 2″ wide chrome colored duct tape to the seams.
View attachment 30258 The two upper Coroplast cabinets, although small and light weight, are strong and hold a fair amount of items.
View attachment 30259
This little drawer is actually my favorite detail in the camper.
View attachment 30260Although I’m not an advocate for Walmart practices, I reluctantly found my speakers their for cheap.
If you buy a dollar meal you can also order a cup of ice. Place the ice in a zip lock bag, stick it in your little cooler and you have a micro frig for a day.
Plans are now available for this camper. I’ve also added lessons and improvements in the plans.
Attachments
-
 IMG_6346-1024x768.jpg187.1 KB · Views: 3,012
 -
 IMG_6394-1024x768.jpg122.5 KB · Views: 1,788
 -
 IMG_6417-1024x768.jpg95.7 KB · Views: 1,721
 -
 IMG_6395-1024x768.jpg148.7 KB · Views: 1,604
 -
 IMG_6440-1024x768.jpg96.9 KB · Views: 1,618
 -
 IMG_6447-1024x768.jpg132.2 KB · Views: 1,545
 -
 IMG_6451-1024x768.jpg140.5 KB · Views: 1,733
 -
 IMG_6465-1024x768.jpg125.6 KB · Views: 1,556
 -
 IMG_6474-1024x768.jpg125.8 KB · Views: 1,575
 -
 IMG_6534.jpg110.7 KB · Views: 1,581
 -
 IMG_6544.jpg152.3 KB · Views: 1,513
 -
 IMG_6594-1024x768.jpg275.2 KB · Views: 2,004
 -
 DSCN0160-1024x768.jpg211.6 KB · Views: 1,520
 -
 DSCN0189-1024x768.jpg228.2 KB · Views: 1,641
 -
 DSCN0152-1024x768.jpg258.4 KB · Views: 1,548
 -
 IMG_6702-1024x768.jpg217.1 KB · Views: 1,572
 -
 DSCN0202-1024x768.jpg260.7 KB · Views: 1,476
 -
 DSCN0139-1024x768.jpg197.7 KB · Views: 1,741
 -
 DSCN0190-1024x768.jpg324.3 KB · Views: 2,034
 -
 DSCN0127-1024x768.jpg197 KB · Views: 1,611
 -
 DSCN0182-1024x768.jpg222 KB · Views: 1,546
 -
 DSCN0139-1024x768.jpg197.7 KB · Views: 1,445
 -
 DSCN0136-1024x768.jpg203.7 KB · Views: 1,512
davethslvia
New member
That's
Shit Beetle
New member
I literally just found this video on YouTube and came to the forum to post it haha. I'm glad I checked first! I've got an idea to make two campers similar to this, only I want each to have a wall that flips up (port and starboard respectively). My idea is my girlfriend and I would each pull one but then they could connect side-by-side when we camp for the night...Maybe one would be hinged at the top and the other hinged from the bottom so they can just fold and overlap onto each other? Just spit-balling ideas. Either way it's a cool design! Maybe now all those Trump 2020 signs will FINALLY have a good use haha